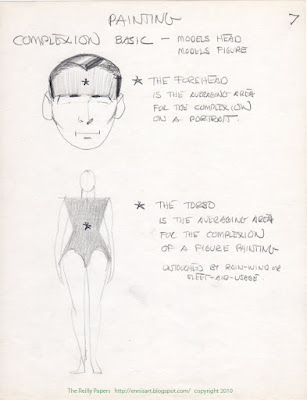
"The complexion should be first comprehended as a generality. Visualize at the start of a painting the model at 200 ft. All the colors of the model would average out into a generality. As the painting would proceed to completion, technically the model would come closer and closer and as this happens the complexion would then divide up into smaller color changes for you to paint into the chosen basic complexion."
On the Head:
The string of complexion flesh tones on your palette, chosen from the forehead for a portrait, represents the average of the subject's complexion, as if seen from a distance. Once this average is laid in, you will begin to see and make local changes. Remember, we are thinking in terms of hue, value and chroma. In general, the middle area of the face becomes darker (value), redder (hue) and stronger (chroma) than the average, while the lower section is darker and weaker than the average, as Reilly illustrates below.
On the Figure:
On the figure, where the complexion average is drawn from the torso, you will see the complexion become darker, redder, and stronger as it approaches the extremities.
 |
| Here Reilly illustrates differences between a light, middle and dark complexion. |
© 2010 John Ennis
Next topic: The Lay-In


1 comment:
Really enjoying reading Mr. Reilly's notes & your explanations. I've never been to art school or had much in the way of classes, and I'm trying to learn about the history and technique of drawing and painting, as well as improving my own work. This blog is a great help to that end. Thank you!
Post a Comment